|
<< Click to Display Table of Contents >> Web Server Option |
  
|
|
<< Click to Display Table of Contents >> Web Server Option |
|
SpecView offers an integrated Web Server feature, available as an option in the dongle (license).
This internal Web Server facilitates periodic sharing of the SpecView program's current display as a web page, allowing access via standard web browsers.
This enables SpecView to be accessed, and optionally interacted with, on phones, tablets or a remote browser on a computer.
The system captures a screenshot of either the SpecView screen area or the entire PC screen, which is then displayed through the Web Server.
To ensure accuracy, it is advisable to avoid running other programs over the SpecView interface; otherwise, the screenshot will display the overlaying application instead of SpecView.
Limited interaction with the SpecView program is possible through the Web Server as of SpecView 3.1.267.
Users can click on the screenshot of the PC screen on the Web Server and have that click registered on the actual PC running the Web Server.
Currently, the connection to SpecView's Web Server does not use HTTPS.
The connection uses HTTP on Port 80 by default.
With this functionality, the local PC running SpecView, the system directly connected to the instrumentation, can be accessed remotely using tablets and smart phones.
Access is possible if the devices are connected to the appropriate network and meet the necessary access requirements.
For users who need to fully and independently view and interact with a SpecView system located elsewhere, it is essential to use SpecView's Local/Remote networking facility.
When using the SpecView's Multi-User System, remote users can engage with the project without disrupting the activities of local users.
However, when accessing the project via the Web Server, simultaneous interactions by both a local user and a remote user may lead to conflicts regarding control of the project.
This issue persists even if multiple remote users access the local project concurrently through the Web Server.
Follow the steps below to access the Web Server on any browser.
| 1. | Access SpecView Preferences by selecting File > Preferences or using the Ctrl + E keyboard shortcut within the SpecView project. |
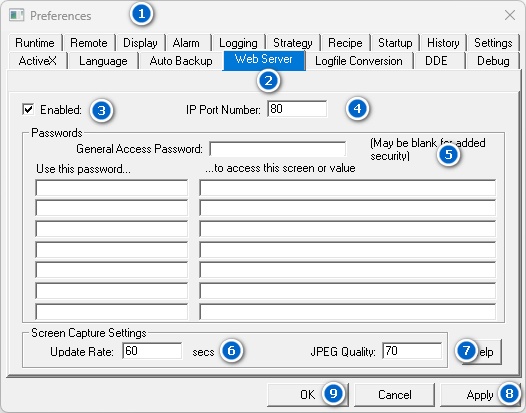
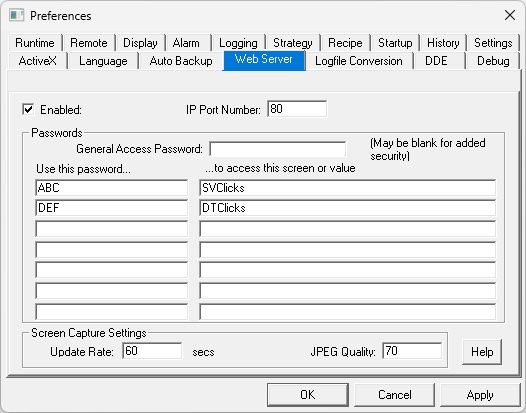
| 2. | Navigate to the Web Server tab in the Preferences dialog box. |
| 3. | Select the check box adjacent to "Enable the Web Server". |
| 4. | Specify an appropriate port number in the IP Port Number field. |
The default setting for the Web Server is port 80.
Users will need to confirm with their company’s IT department to ensure that this does not conflict with any other applications.
Read Setting Up Port 80 For SpecView’s Web Server below for further details.
| 5. | The General Access password is for the Web Values feature and is not required for the Web Server. |
For details on the Web Values feature, consult your SpecView representative.
| 6. | The update rate is by default 60 seconds. |
SpecView will update a new screen shot every 60 seconds.
Users can update this if they need SpecView to update images faster.
It is recommended to leave the update rate at the default value of 60 to minimize the load on the SpecView server.
If the update rate needs to be increased, please contact a SpecView representative first to avoid mismatched refreshing rates between the Web Server and the remote browser.
| 7. | The JPEG quality is at the default of 70. |
The JPEG quality ranges from 0 – 100.
0 being low quality with a high amount of JPEG compression and 100 being high quality with little JPEG compression.
It is recommended to leave the JPEG quality at the default value of 70 as this is a good compromise between speed of access and quality of image.
| 8. | Click on Apply. |
| 9. | Click on OK. |
The Web Server is now active – and will remain active regardless of which SpecView project is opened.
If SpecView is shut down, the Web Server will stop.
| 1. | Verify with the IT department that Port 80 is open and available to be utilized. |
Port 80 is the standard port for web pages (http) and so may conflict with another web server running on the same computer – or may make it difficult to access this Web Server from outside via the Internet.
| 2. | Open the Windows Control Panel > Network and Internet > Network and Sharing Center. |
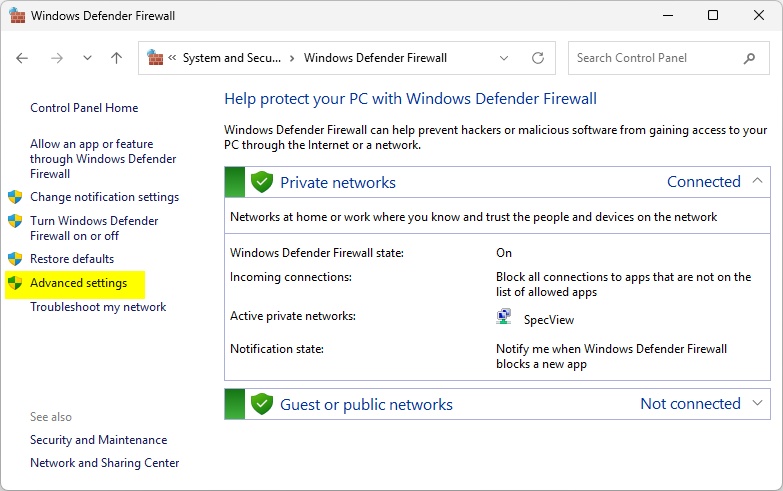
| 3. | Click on Windows Defender Firewall. |

| 4. | Click on Advanced Rules. This will open the Windows Defender Firewall with Advanced Security box. |
| 5. | Click on Inbound Rules. |
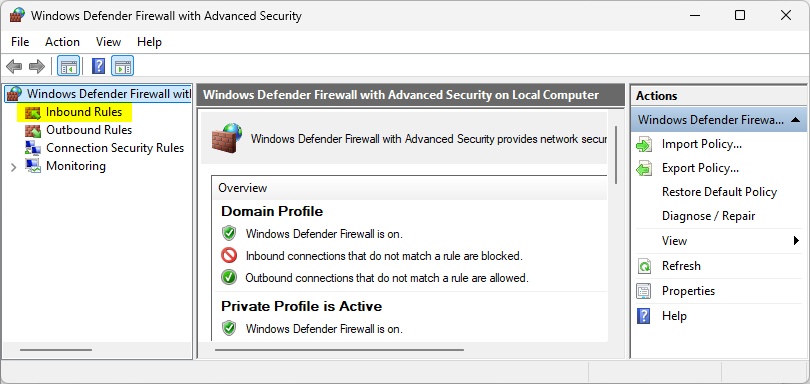
| 6. | Click on New Rule. This will open the New Inbound Rule Wizard. |

| 7. | Click on Port and then click Next. |

| 8. | Click on Specific Port, enter 80 into the field, and click Next. |

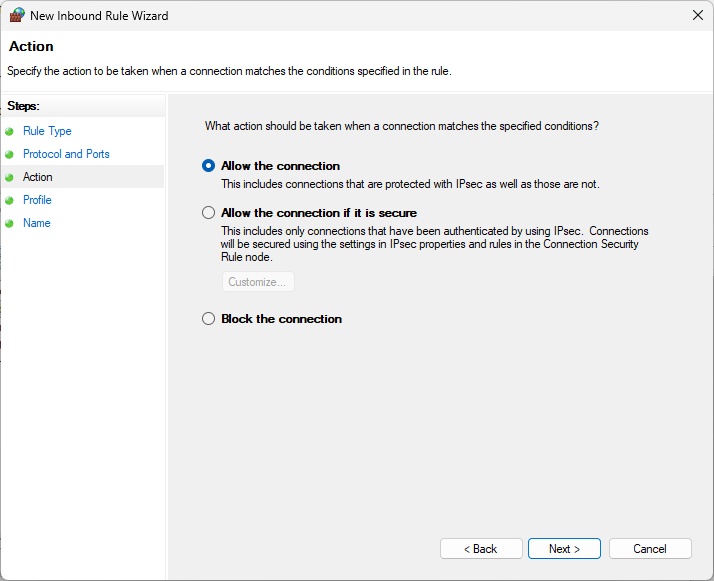
| 9. | Click Allow the connection and click Next. |
The user should confirm with their IT department regarding when this rule should apply.
It is recommended to start with enabling all domain, private, and public, connections.
The user can edit this setting later once the Web Server is operational.
Click on Next to continue.
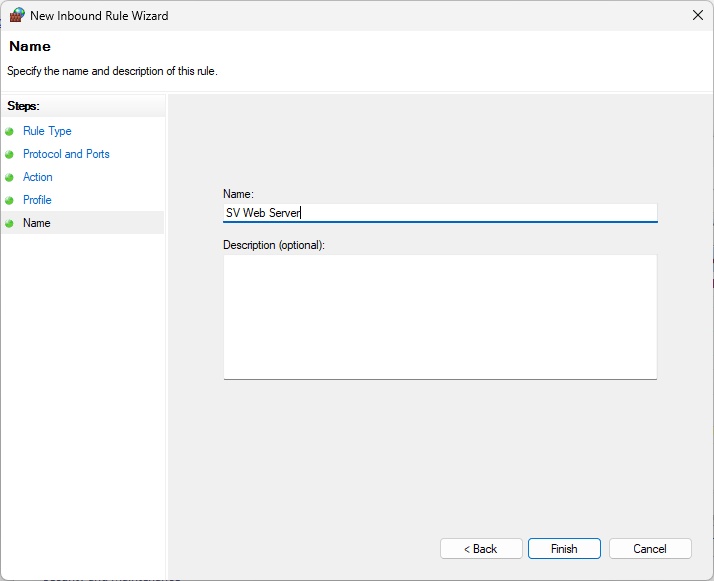
| 10. | Provide an appropriate name for the new Inbound Rule and click Finish. |
SpecView’s Web Server will now be able to accept connections on Port 80.
The steps mentioned in Setting up the Web Server still apply.
Implement the following steps before Step 8, the last step.
| 1. | Enter the command “SVClicks” in a field under “to access this screen or value”. |
| 2. | Enter an appropriate password for “SVClicks” in the same row but under “Use this password” column. |
| 3. | Repeat Steps 1 and 2 for the command “DTClicks” if users need to interact with the entire desktop screen. |
The command “SVClicks” will present the user with a screen shot of just the area of the SpecView window.
It will not show any surrounding screen contents.
The command “DTClicks” will present the user with a screen shot of the entire PC screen, including the Taskbar.
This enables users to interact with the desktop and any other program running on the computer, whereas “SVClicks” only allows access to the SpecView screen area.
It is strongly recommended to be extremely careful when utilizing "DTClicks" as this feature does enable users to access and control any programs and data on the PC.
(Step 8 from Setting up the Web Server) Click on Apply and then click on OK.
The Web Server is now active and ready to be interacted with.
| 1. | Verify that both the device attempting to access the Web Server and the PC hosting the Web Server are connected to the same network. |
| 2. | Determine the IP address of the PC hosting the Web Server: |
On the server PC, launch the Command Prompt terminal.
Input the command “ipconfig”.
The resulting output will display the PC’s IP address.
| 3. | Identify the IP address of the connecting device. |
For instance, if the connecting device's IP address is 192.168.1.23 and the server PC's IP address is 192.168.2.63, this indicates they are on different networks.
In such cases, please consult the company’s IT department for assistance.
| 4. | Using the device that will connect to the Web Server, open a web browser and navigate to a new page. |
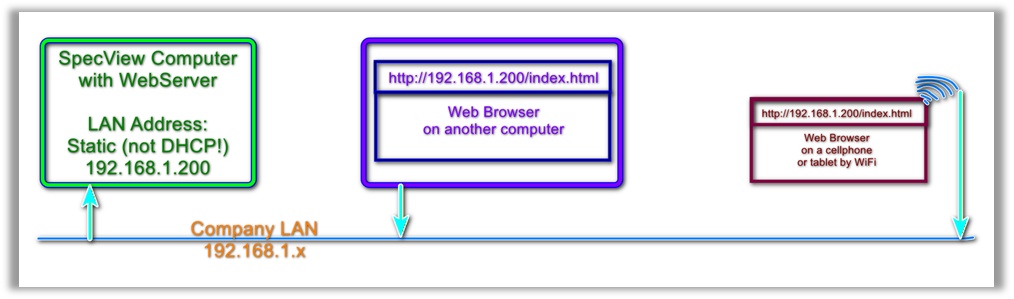
| 5. | Enter the IP address of the PC running the Web Server in the browser’s address bar, followed by “/index.html”. |
For example, if the IP address of the PC hosting is 192.168.1.17, enter “192.168.1.17/index.html” in the address bar.
If the user needs to interact with the Web Server, enter the IP address of the PC running the Web Server in the browser’s address bar, followed by “/index.html?SVClicksPassword”.
For example, if the IP address of the PC hosting the Web Server is 192.168.1.17 and the “SVClicks” password entered in Interacting with the Web Server above is “ABC”, enter “192.168.1.17/index.html?ABC” in the address bar.
Press ENTER; the web page should then load the screenshot of the SpecView application.
To access the desktop, follow the steps mentioned above and replace the "SVClicks" password with the "DTClicks" password.
It is strongly recommended to be extremely careful when utilizing "DTClicks" as this feature does enable users to access and control any programs and data on the PC.
| 6. | Press ENTER; the web page should then load the screenshot generated by SpecView. |
By default, this screenshot updates every 60 seconds.
If utilizing "SVClicks" or "DTClicks", the user can click anywhere on the screenshot of the PC, and the click will be registered on the PC.
For example, if the user clicks on the screenshot where a button is, then button will be clicked on the PC running the Web Server.
There are many ways that companies access the Internet and hence it is difficult to be exact about the things that need to be set up to assess incoming access from a remote browser.
What follows is a very brief description of what is needed, seek help from the I.T. Department for the details.
A brief discussion of terms used:
| • | ISP: Internet Service Provider. This is the company supplying Internet |
| • | Router: The device that allows connection to the Internet |
| • | Public IP: This is the IP address on the Internet that your company router is connected to. |
| • | LAN: Local Area Network – the company network inside the building |
| • | Dynamic IP: An IP Address that changes |
| • | Static IP: An IP address that is fixed |
| • | DNS: Doman Name System – the method the Internet uses to associate a name with an IP address. |
| • | DDNS or Dynamic DNS: A Service that allows an Internet Name to be associated with a Dynamically changing IP address. |
| • | Port Forwarding: A way to route packets inside the company in the LAN |
Here are 3 diagrams outlining how a cellphone / tablet or any other computer with a Web browser can access the SpecView Web server in different scenarios:
| 1. | Access only from within the company, NOT outside. |
| 2. | Access from outside where a Static Public IP is setup, or a fixed DNS is already in use, Port forwarding setup to route packets to the SpecView computer. |

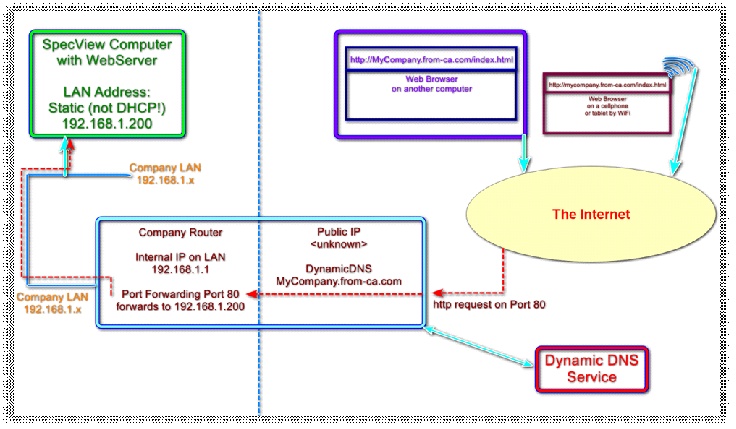
| 3. | Access from outside where ISP uses Dynamic IP and Company uses Dynamic DNS to map MyCompany.from-ca.com to the SpecView computer through the router. |
When a company has internet access, the way that it is assigned an IP address can be either Dynamic or Static.
Dynamic IP. Unless otherwise setup, most businesses and individuals have a dynamic IP address assigned by their ISP. This Dynamic IP address can change every day or every week, as the ISP does it’s normal things. This means that it is usually difficult to connect into the company because the Public IP address can change from time to time.
Static IP. This is usually an extra cost service from the ISP, where one or more IP Addresses are assigned to the company and will not change. This makes it easy to connect to the company because the Public IP address will not change. Some ISPs supply static IP as an extra cost service, others do not allow it at all.
In the case where Static IP is not available, the Dynamic IP that is the usual case makes it difficult to know what the Public IP address of the company is, and so makes it near impossible to connect to the company from outside.
To solve this problem, a Dynamic DNS (DDNS) service can be used. This is a service that may be in the router, or may be implemented separately which allows an Internet Domain Name to be associated with the company and it is updated as the company’s Dynamic IP address changes.
There are many DDNS service suppliers, with varying costs, varying available domain names to choose from and various service costs. Which one to choose from is up to the IT Department, and the router being used.
One such service is “DynDNS” from Oracle: https://account.dyn.com/

Here, a Dynamic DNS domain name service may be purchased, for example:
The oval highlight shows the company name and the various domains available are in the green box. In this example screenshot, the Dynamic DNS name would be: mycompany.from-ca.com
This name would remain fixed as the company’s Public IP address changes, meaning that there is a fixed, known address that can be typed in that will always reach the company.
Then, in the company’s Internet Router, the DDNS service can be enabled to manage the changes, or a third party application can be run inside the company to achieve the same thing.
Having setup a DDNS service, or having a Static IP from the ISP, the last steps are to deal with the various firewalls that are blocking access.
Setup the Internet Router to port-forward the incoming Web Server requests to the target Computer.
Suppose the Computer inside the company, on the LAN, has a fixed static IP address of 192.168.1.200.
The Internet Router needs to be setup to port forward Port 80 from the Internet to the 192.168.1.200 computer.
If port 80 is already being used by the company for it’s own Web Server, then both SpecView and the Port forwarding need to be changed to use an alternative port.
The Final step is to setup the SpecView Computer at 192.168.1.200 to allow incoming port 80 requests through the firewall.
How this is achieved depends on the firewall / Endpoint Security / Antivirus setup, so the IT Department can help with that.
Please read through Setting Up Port 80 For SpecView’s Web Server.