|
<< Click to Display Table of Contents >> Troubleshooting Instrument Communication |
  
|
|
<< Click to Display Table of Contents >> Troubleshooting Instrument Communication |
|
What to do if your instrument is just displaying 'N/R' instead of the correct values when in Runtime mode:
For serial comms connections - please first check the wiring (daisy-chain), see here: Instrument Installation and Wiring
Is this a new installation of SpecView, which has not as yet ever worked?
Is this happening for ALL of the instrument's variables?
If the answers to the above 2 questions is Yes, then:
| o | Has the wiring between the instrument & the PC been checked? |
| o | Has the instrument's manufacturer's manual been checked for any relevant information? For example, the setting of the instrument's address (address 0 should not be used). |
| o | Is the instrument's address, baud-rate and parity correctly set on the instrument? |
| o | Is the instrument's address is correctly specified in SpecView? (Click the Variables List tool, select the instrument's name and click Properties, then click Address Help) |
| o | Check the instrument is connected to the correct COM port, as specified in SpecView. |
| o | Does the COM port on the computer work? (Use HyperTerminal to test the COM port). And is the correct type of COM card fitted in the instrument? |
| o | Is the instrument's baud-rate and parity correctly specified in SpecView? From Runtime mode use the 'Setup COM Ports' menu command on the Options menu, click the tab for the appropriate COM port. Check the baud-rate & note down the name & version number of the driver. When the Settings are show 'Default' that means that the data-bits, parity & stop-bits have been set according to the factory defaults as specified in the instrument manufacturer's manual. |
| o | Is the instrument using the correct protocol? (for example, ASCII protocol versus modbus protocol) |
| o | Is the instrument terminated correctly? |
| o | Do you need a converter, which is needed for: RS422 or RS485 serial comms? (The reason the B&B converter is recommended for SpecView is because it has 'Automatic Send Data Control', which automatically switches from transmit to receive). |
| o | Does the converter work? Has it been wired up correctly according to the wiring diagram supplied with it? Does it require power and is it switched on? Have any dip-switches been set according to the instructions? Do other connected instruments work? Is it possible to swap it around to test it? |
| o | Has SpecView's Online Technical Notes been checked for this instrument type? Access www.specview.com then click Download and click FTP-site and open the TechNotes folder. |
| o | Some instruments have to be setup to allow their variables to be read. For example, setting the access level. |
| o | If the N/R is coming from an OPC Server, then contact your OPC Server's administrator to see if the OPC Server is running correctly. |
| o | If all of this has been checked then please contact your instrument's supplier. |
If SpecView has been working successfully, but has now stopped working, or if just some of the instrument's variables are displaying as 'N/R' or 'NPV', then:
| o | Firstly be aware that some instruments are designed in such a way that, depending on the instrument setup, instrument mode or program considerations, some values are legitimately unavailable - these variables will be shown as 'NPV's. This is normal & correct behaviour for that instrument. Two common examples of this are: 1: Programmer instruments, where segment variables change their availability depending on segment type. 2: Instruments where optional hardware is not present, for example output boards not fitted, or auxilliary inputs not configured/fitted. Please see the instrument manual for which variables may or may not be available under these circumstances. |
| o | Is this an intermittent failure? |
| o | What is the value of the variables: SpecView.CommsErrors, SpecView.GoodComms, SpecView.CommsErrorCode, Specview.CommsErrorDescription & SpecView.CommsErrorItem? These variables can be added to a GDW and/or logged. To Log these variables, use 'Database->Show Logging in Variables List' from the Setup menu and check the boxes next to these variables in the Variables List, then from Runtime mode use Convert Log File from the Logging menu to create a Log File Convert Format which contains these variables. Note that the variables will not be listed in the Log Format Setup box until they have been logged according to the rate defined in Preferences - Logging or from the action Logging: On/Off. |
| o | Has the wiring between the instrument & the PC been checked and tested? |
| o | Has anything been altered or added to either hardware or software? |
| o | Has SpecView's Address Help for the instrument been checked? To view this go into Edit mode, use the Variables List tool, select the instrument's name and click the Properties button, then click Address Help. |
| o | Has SpecView's Online Technical Notes been checked for this instrument type? Access www.specview.com then click Download and click FTP-site and open the TechNotes folder. |
Using the Line Writer to troubleshoot comms problems:
This will create a file which lists the date, time & cause of any comms errors.
(This will be a file separate to SpecView's standard Log Files or Log File Reports).
To do this create a Strategy Controller value based event: 'When CommsErrors changes' that watches SpecView.CommsErrors and when it changes does the action SpecView: Write Line to file/printer of:
+CommsErrors.csv %%SpecView.Date%%,%%SpecView.Time%%,%%SpecView.GoodComms%%,%%SpecView.CommsErrors%%,%%SpecView.CommsErrorCode%%,%%SpecView.CommsErrorItem%%, %%SpecView.CommsErrorDescrption%%
It is also a good idea to remove the commas from the date format in Preferences - Display to prevent these commas from adding unnecessary columns to the CSV file.
Using SpecView's Driver Debug:
If all the above has been thoroughly checked then the next step is to send your SpecView representative Debug files.
These debug file(s) need to be as small as possible, at the same time as being as relevant as possible. The extra effort taken to create these will be much appreciated by your SpecView representative and will enable them to give you an answer promptly.
Therefore the aim is to have a minimal Project (by using the New Manual Project button) with just a single GDW displaying just one of the instrument variables which is causing trouble.
Alternatively, create a new GDW in an existing Project, and put just one of the variables which is causing trouble out on to it. Then using File->Preferences disable Logging (on the Logging tab), disable Alarms (on the Alarms tab) and Strategy (on the Strategy tab). Ensure that none of your other GDWs have File->Auto-open on Runtime enabled. (NB: Once the problem has been resolved these changes will need to be reversed).
To create the Debug file(s) follow the steps below:
If your instrument is NOT using the Modbus (or Modbus TCP/IP) protocol then use:
DEBUG = 1
Note: Not all drivers support DEBUG = 1, in which case you will see the error: 'Driver commands not accepted' if this occurs please contact your SpecView representative.
If your instrument is using the Modbus (or Modbus TCP/IP) protocol then use:
DEBUG = 15
DEBUGSIZE = 1
DEBUGAUTODEL = 9 (This will create up to nine 1Mb files)
To set these up:
From SpecView's Runtime mode use the Setup COM Port menu command from the Options menu, click the appropriate tab for the port being used.
In the bottom-left-hand box enter DEBUG, then in the next box enter either 1 or 15 appropriately, then click the Add button:
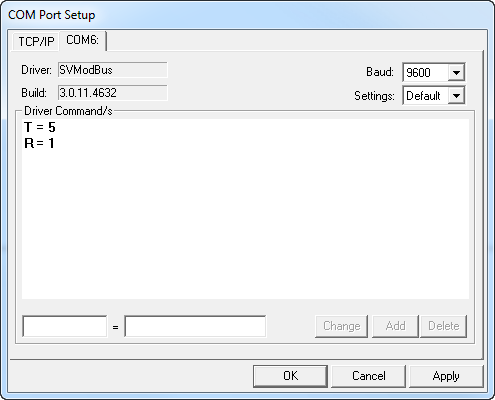
The Driver Commands box will now show the value for DEBUG.
Then (if required) do the same for: DEBUGSIZE = 1 and DEBUGAUTODEL = 9
Then wait for at least one minute, but no more than three minutes, then Exit SpecView
In your Project's folder under SpecView's installation folder (usually C:\SV3) you should now find some .TXT files where the names start with 'debug', for example: debug_COM1.txt
Email these file(s) to your SpecView representative.
You will also need to email an SVA (SpecView Archive) of your Project. To do this use SpecView's Archive button (which is on the Projects Found box when SpecView starts up). Ideally this should be done with the 'Include log files' checkbox un-checked.
Remember to set Debug back to zero afterwards.
See also: Handling lost COMMS.