|
<< Click to Display Table of Contents >> File Menu (Edit Mode) |
  
|
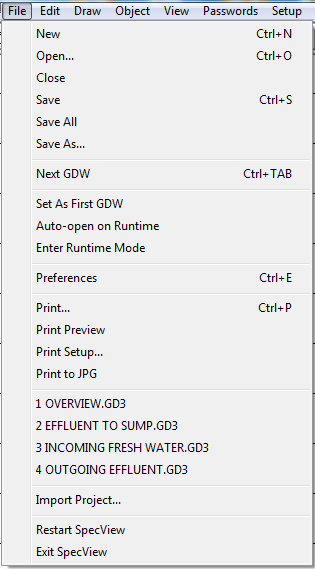
File Menu (Edit Mode)
|
<< Click to Display Table of Contents >> File Menu (Edit Mode) |
|
New
Shortcut: Ctrl + N
Toolbar:  Opens a new blank GDW
Instrument Views and Variables can be added to this new GDW by clicking on the Variables List tool ![]() and a button can be used to swap between GDW's during Runtime Mode as is described in the Quick Start Guide.
and a button can be used to swap between GDW's during Runtime Mode as is described in the Quick Start Guide.
Open (Edit Mode)
Shortcut: Ctrl + O
Toolbar: ![]() Opens an existing GDW . Same function as File Open (Runtime Mode)
Opens an existing GDW . Same function as File Open (Runtime Mode)
Close (Project)
Closes a GDW (Note: The last GDW can't be closed)
Save
Shortcut: Ctrl + S
Toolbar: ![]() Saves a GDW This will save all changes made.
Saves a GDW This will save all changes made.
NOTE: There is no 'Replace Existing?' warning box, so to save as a different name use Save As… on the File menu.
Save As
Saves a GDW with a new name. This is used to make an exact copy of a GDW and then edit the variables.
Set As First GDW
This only applies where a project contains more than one GDW.
Click this menu command to make this GDW the first window when entering Runtime Mode.
If this is not set, then the last GDW to be edited will be the first one opened when entering Runtime Mode.
Auto-open on Runtime
Click this menu command to tell SpecView to open (start) this GDW when entering Runtime Mode
NOTE: Be sure to click this menu command on all of the GDWs which have Trend charts. Then switching between the GDWs will show all the current information on the Trend charts. If you do not, each of the GDWs will have to be opened in Runtime Mode before the Trend chart lines will start to be drawn.
Enter Runtime Mode
Toolbar:  Exits Edit Mode and enters Runtime Mode. This will start communicating with the connected instruments.
Preferences
Shortcut: Ctrl + E
Click this menu command to display the Preferences box to modify SpecView's settings.
Print (Edit Mode File menu)
Shortcut: Ctrl + P
Toolbar: ![]() Prints the current GDW . Use the Print Setup menu command to change your printer settings.
Prints the current GDW . Use the Print Setup menu command to change your printer settings.
Print Preview
Previews how the printed GDW will look when it is printed from Runtime mode.
Print Setup (Edit Mode File menu)
Use this to change the printer settings, such as:
- Using landscape format.
- Using a different printer, for example, if Adobe Acrobat is installed then this can be selected to create a PDF (Portable Document Format) file.
Print Options
Use this to control how the contents of a screen are positioned and resized on the paper, see Printing.
Print to JPG
Puts an image of the whole screen, including the Windows task bar if it is visible (not just the contents of the GDW) to a .JPG (Jpeg format) file.
The filename of the file that is created has the date and time in the format:
YYYYMMDD_HHMMSS.JPG
The file is written to the current Project folder.
If more than one request to 'Print to JPG' is made at the same second, then the file will be overwritten.
There is also the Button & Strategy Controller action: GDW Control: Print Screen which allows 'JPG' to be selected from the list.
Recently Used File List
Shows the four last GDW's that were edited. Clicking on one will open it.
NOTE: If the GDW was in another project all dynamic links will be removed. Do not open a GDW from another project unless only the background and graphics are needed.
Import Project
Import another project into this one to combine the two.
Restart SpecView
Restarts SpecView as if the user had exited and started it again.
Exit SpecView
Shortcut: Alt + F4
Closes all GDW's and SpecView.