|
<< Click to Display Table of Contents >> Configuring SpecView |
  
|
|
<< Click to Display Table of Contents >> Configuring SpecView |
|
Run the Example.py script to ensure that the script can run with no errors.
Example.py is an example script that creates a Modbus Server and demonstrates the following functions when a client such as SpecView writes to its Holding Registers.
Users can read on how to set up these registers in the steps below.
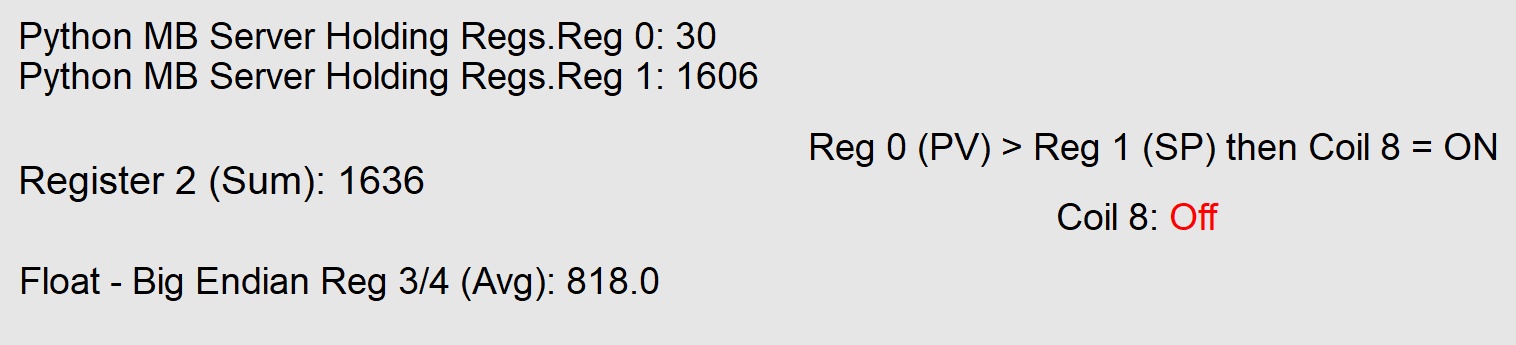
| • | The Modbus Server sums the values of Register 0 and Register 1 in SpecView’s Generic Modbus Holding Registers and writes the sum in Register 2. |
| • | The Modbus Server writes the average of Register 0 and Register 1 in Register 3 and 4 as a Float type. |
A user will require the use of a 4X IEEE Float Register Big Endian with an offset of 3 to read this average value correctly.
| • | If Register 0’s value is greater than Register 1’s value, then the Modbus Server will write 1 to Coil 8. |
This showcases the concept of how to turn ON an output (Coil 8) when a Process Value (Register 0) is greater than a limit (Register 1).
| • | If Register 5’s value is greater than Register 6’s value and Register 5’s value is less than the value of Register 7, then the Modbus Server will write 1 to Coil 9 |
This showcases the concept of In Range.
The Modbus Server will turn ON an output (Coil 9) if the PV (Register 5) is within the range set by the Low Limit (Register 6) and High Limit (Register 7).
Also, the Modbus Server demonstrates the following when a client like SpecView writes to its Coils.
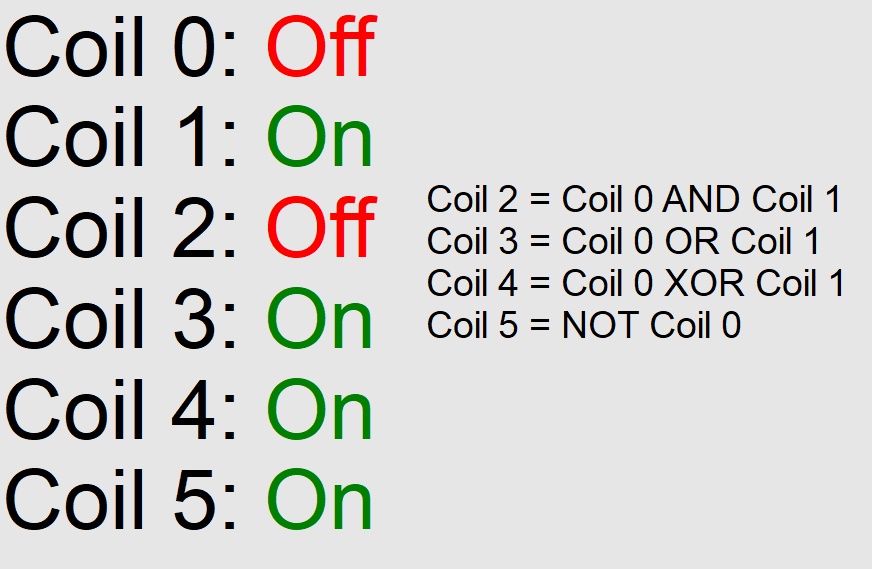
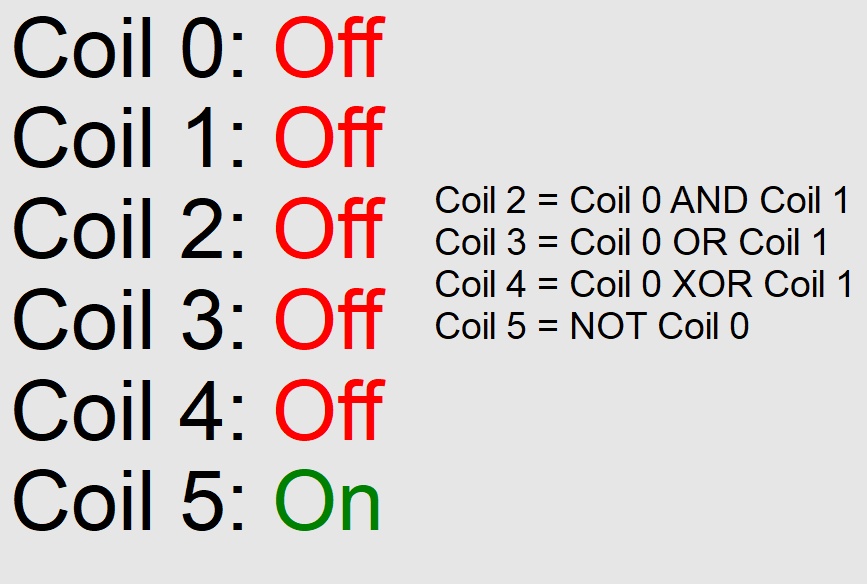
| • | Coil 2 is On when Coil 0 AND Coil 1 are on. |
| • | Coil 3 is On when Coil 0 or Coil 1 are on. |
| • | Coil 4 is On when Coil 0 XOR Coil 1 is true. |
| • | Coil 5 is the bitwise complement of Coil 0. (i.e. NOT) |
This showcases the bitwise operations that are possible using the Modbus Server.
Users can read how to set up these Coils in the steps below.
Step 1: Run the Python Script in an IDE or Notepad
Step 2: Set Up SpecView for Modbus Communication
Step 3: Interact with Modbus Registers
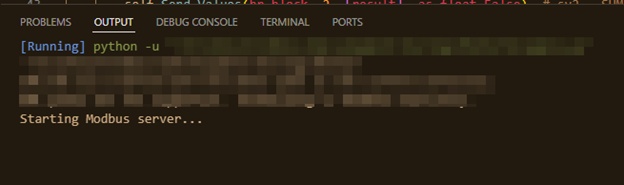
Open the script in the chosen Integrated Development Environment (IDE). Execute the script to ensure there are no errors during startup.
If the user chooses to use Notepad, then double click the Example.py file to run it in the Terminal.
If the script runs successfully, the user should see the message “Starting Modbus server …” appear in the Output or Terminal window.
This confirms that the Modbus server is operating as expected.
If there are errors such as “pymodbus is not recognized”, then please verify …
| 1. | Pymodbus was installed as mentioned in Install Pymodbus |
| 2. | That the script is being run locally from the PC and not from a network drive. |
| 3. | There are no alternate versions of Python installed on the PC and that Python was installed as explained in Download Python. |
If other errors are encountered at this point, try searching for the error on the internet to see if other programmers might have experienced a similar error.
If no viable solutions are mentioned online, then contact a SpecView representative.
The SpecView project referenced in this section has already been configured and is available under the Demo section as the Python Demo.
It is highly advisable to review this section for a comprehensive understanding of how the project was configured to interface with the Python Modbus server.
| 1. | In SpecView, begin by either opening a new project or accessing an existing project. |
| 2. | Switch to Edit Mode (Online) and open the Templates/New Instruments List. |


| 3. | Locate and double-click on “Generic Modbus” to expand its options. |
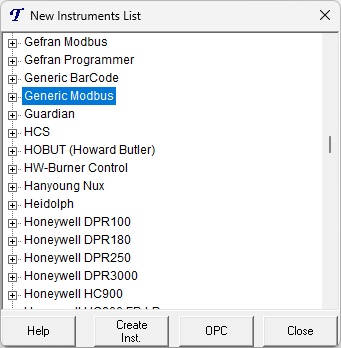
| 4. | Within the expanded section, double-click on “4X Holding Registers Unsigned – 100 Regs.” |

| 5. | In the “Add/Rename Instrument” dialog, enter a suitable name for the Modbus server in the Name field. |
| 6. | From the COM Port drop-down menu, select “TCP/IP.” |
| 7. | Enter 127.0.0.1 in the Hostname field to reference the local server. |
| 8. | Specify the required number of decimal places in the Decimal Places field. |
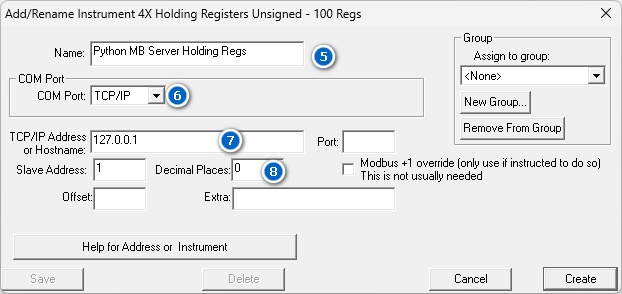
| 9. | Repeat Steps 5 – 9, for a "4X IEEE Float Register Big Endian" found in Generic Modbus. |
| 10. | The Offset value this time will be 3. |

| 11. | Repeat Steps 5-9, for a "0X Coil Status" instrument found in Generic Modbus. |

| 1. | Open the Variables List. The newly added Generic Modbus instruments should be visible. |

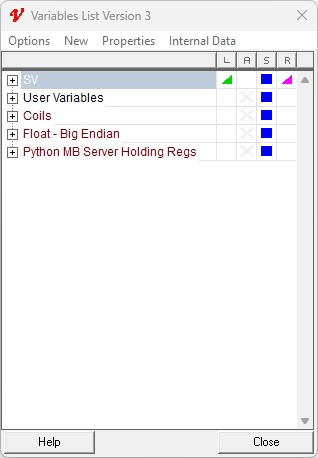
| 2. | To view the individual registers, click the + icon next to the instrument’s name in the Variables List. |

| 3. | All the Holding Registers should initially display a value of 15. |

| 4. | Double-click the value of Reg 0 or Reg 1 in the Variables List and update it as needed. |
Once Reg 0 or Reg 1 has changed, Reg 2 will automatically reflect the sum of Reg 0 and Reg 1.
Reg 3 and Reg 4 will display the average of Reg 0 and Reg1.
This value will be an IEEE Float.
To see the value displayed as a Float, follow Step 2 and expand the 4X IEEE Float Register Big Endian that was created in Step 10 of Set Up SpecView for Modbus Communication.
Coil 8 will turn ON if Reg 0’s value is greater than Reg 1’s values. To view the Coils, follow Step 2 and expand the instrument created in Step 9 of Set Up SpecView for Modbus Communication.

| 5. | Double-click and edit the values of Reg 5 (PV), Reg 6 (Low Limit), and Reg 7 (High Limit). |
If Reg 5 is greater than Reg 6 and Reg 5 is less than Reg 7, then Coil 9 will be turned ON.


| 6. | Double-click and edit the value of one or more of the Coils. |
Coil 2 = Coil 0 AND Coil 1
Coil 3 = Coil 0 OR Coil 1
Coil 4 = Coil 0 XOR Coil 1
Coil 5 = NOT Coil 0


| 7. | The Output or Terminal window in the IDE or Command Prompt will show a log entry in the format below if the Holding Register has been written to. |
Writing values [23] to address 2
WRITE: sv0=15, sv1=23, SUM -> sv2=38, AVG -> sv3=19.0
If the Coils were written to, then the format will be seen as shown below.
Writing values [True] to address 1
Coil changed at address 1 with values [True]
Current Coil Values: [True, False, False, True, True, False, 0, 0, 0]

After verifying that the Example.py script executes without errors, users can confidently begin modifying the Python script to incorporate their specific logic requirements.